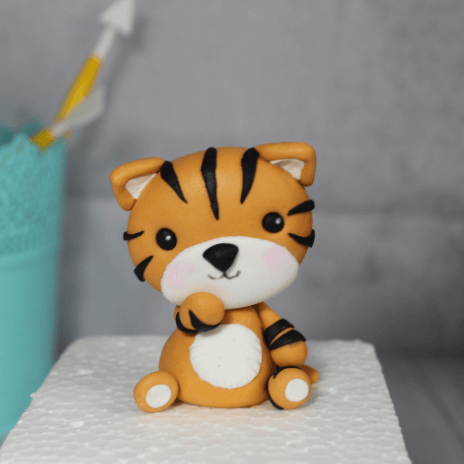
This tiger tutorial was one of your favorites on Instagram and Pinterest so let’s start!
This ‘tiger tutorial’ it is very easy to make, I promise, so don’t worry if you don’t have so much experience. Give it a try and tell me your thoughts. I recommend you to follow the video below to make it easily.
First the body…
Take 15 grams for the body. Place your hand at an angle and move it back and forth. When you have it, place it on the table and make short turns to flatten the widest part on the table.
For the lower legs…
For the upper legs, make two tears. Each one of a gram.
And for the back legs, repeat the same process, each one of a gram. Stretch white fondant and cut out two circles. Then, stick them in the widest part. You can also press using the ball tool.
To make the head shape…
Make a 40 gram ball. Roll an oval shape or elongated ball. After that, flatten it gently with your palm.
Stretch some white fondant, the thinner, the better. Use a round cutter and cut out a circle. Stick it at the bottom part of the head.
Use a ball tool to make two indentations for the eyes. Use an edible marker to draw the mouth and make a triangular black shape for the nose.
You can have a deeper look in this video, remember to subscribe and leave a like if you enjoy it!
To make the eyes…
For the eyes, you will need two black fondant balls. Remember: they must fit. Insert them, and then, use a white edible marker to paint two dots.
Then, to make the ears and the tail, watch the video below and also for more detailed directions.
Time to put it together
To assembly, first insert the body on a skewer and stick the head on top. Then, stick the legs as you like. And the ears on the sides of the head. And finally, stick some strips along the body.
You can have a deeper look in this video, remember to subscribe and leave a like if you enjoy it!
Would you like to receive tips, news and tutorials from the web in your email? Sign up for the newsletter.